
What to Put on a Basic Traditional Cheese Board
The beautiful thing about making a cheese board is … there is no wrong way!
As we all well know, however, starting something new can be intimidating. Especially when armed with a wealth of information and no idea where to start.
So with that in mind, I give you an easy place to start: the (very) basic layout for a traditional cheese board.
Step 1: Find The Cheese

Find a store with a great cheese curator – keep in mind sometimes these hidden gems are not at your big-box all-in-one-stop shopping places. I’ve found some really nice cheeses at farmer’s markets, small town local grocers, and even gas stations!
TIP: Go to your local grocery store and get chatty with your cheese buyer. Even if they don’t currently carry the unique and awesome cheeses, if enough people ask, they might start to carry them… or at least tell you where you can find them.
Your local cheese expert, or cheesemonger, will love getting to share their knowledge with you! Just let them know how experienced you are, or inexperienced. If you give them a guide to go by… what you’ve had before (even if it’s just American cheese singles), what your preferences are (did you like, or not like, your cheese singles?), and what your current needs are - I’m almost 100% positive they will be more than happy to answer any of your questions.
Best Cheeses for Your Cheese Board
Grab a mix of textures (soft, semi-, hard, creamy, crumbly, etc); strengths (mild, stinky, sharp, aromatic, bold, or well-rounded); ages (young, aged); milks (cow, sheep, goat); and colors and shapes (for visual interest).
Most of those cheese counters will let you sample cheeses if you don’t know what you’re buying. And many also have a bargain bin where you can get small wedges or wheels for just a few bucks—this is great for cheese boarding!

I prefer to stay away from the flavored cheeses (the ones with all the extra herbs and seasonings not naturally made with the cheese). These extra flavors take away from the cheese’s actual flavor. So while you are exploring different cheeses, stick with unflavored cheeses.
This is not to say stay away from cheeses that have a strong flavor. Explore the boundaries of your taste. You might be surprised.
VARIETY IS QUEEN! ... OR KING, depending on who’s building the board.
This is where you get to explore and try new flavors!
My 6 top go-to charcuterie board cheeses right now are:
-
Machego – A hard cheese with a more intense, full taste that’s slightly zesty, made from sheep’s milk. I prefer semi-aged. This cheese has a rind which is not meant to be eaten.
-
Gouda – This one’s a middle of the road cheese. It’s a little creamy, but not soft. It comes with a bright yellow wax coating, not meant to be eaten. A mild nutty, buttery flavor. Gouda is typically made with cow’s milk; however, it can be found made with sheep’s milk.
-
Brie – A soft, creamy cheese made from cow’s milk. This cheese usually has a stronger, earthy taste to it, sometimes described as mushroom-like. The thin white powdery crust is edible, although some people don’t like to eat it.
-
Cheddar – The familiar cheese almost everyone knows. I prefer the white, sharp cheddar as it sets off nicely against the other cheeses. It’s a hard cheese with a bit of a bitter, nutty, sharp taste. Cheddars do come in a range of flavors, from mild to extra sharp, depending on its age. You can also try different colors as it comes in both orange and white (which affects the presentation more than the taste).
-
Wine cheeses, like the Claret – I think this one’s my favorite for exploring. These cheeses are basically a cheddar but with the addition of the heady overtones of wine … or beer in some cases. I love the beautiful reds that these cheeses can come in, too.
- Chevre – A goat cheese, it comes in a range, with its varieties ranging from firm to creamy. It has a slightly tangy, earthy flavor that increases the more the cheese has aged.

TIP: I wouldn’t go overboard with the number of cheese variations in a single board. I’d stick with 4-5 different cheeses for a single cheese party. You don’t want to overwhelm the palate.
How Much Cheese Should I Buy for My Party?
So the estimate I like to use is this: For a cheese tasting party, I get roughly 6 oz of cheese per person… so for a party of 8, that’s about 3 lbs of cheese. If you’ve got other stuff you plan on including on your cheese board, you could decrease the amount to about 3-4 oz per person.
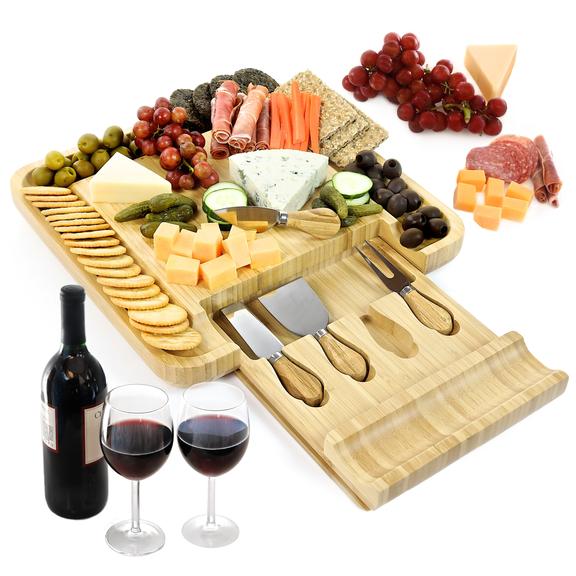
Step 2: Add Some Crackers

Especially if you’ve incorporated some soft cheeses into your mix, you need to select a tasty vehicle for getting the cheese into your mouth. Now I know some people are just fine with scooping up a bit of soft brie on the tip of their finger and licking it off. But at most social gatherings, I prefer to spread my soft cheese onto an edible object that I can then pop into my mouth … it keeps the fingers a little cleaner in case I need to shake someone’s hand!
The options are endless, but I usually go with some form of thin sliced dry or toasted bread. The fruit is one of my go-to’s, but for simplicity’s sake, to avoid conflicting flavors on the first go, we’ll stick to bread or crackers for the basic cheese board.
I like to use plain crackers that don’t take away from the flavors of the food (my favorite right now is La Panzanella Croccantini). It’s thinner and less “bready” than a baguette – keeps the focus on the cheese rather than just filling up on bread.
That said, I have served baguette before, and it is a favorite amongst carb-loving kids. Another option is to include some crunchy breadsticks. They look pretty, and kids think they’re fun to snack on. Pita chips pair nicely with cheese as well.
Step 3: Arrange the Charcuterie Board
I don’t normally pre-slice all my cheese before it goes on the board. There are two reasons for this. First, I think it just looks better. Perfectly aligned rows of pre-sliced cheese just seems a bit too structured for something as wildly exciting as a cheese board. There is something really organic and beautiful about seeing the whole wedge or wheel. Secondly, it’s so much easier for you to prep! Let your guests participate by cutting their own.

Now, how to cut the cheese: I use cheese knives. But you can always use a really sharp kitchen knife, and for softer and/or crumbly cheese you can just use a wire. As for shape – please don’t cut your cheese into cubes. Go for wedges or strips that can be eaten in a bite or two. Not too thin (or it’ll sweat and dry out) and not too thick. The thinner slices release more flavor in your mouth than cubes.
For the crackers, I just pile the crackers on the cheese board wherever there are openings. You can always restock if you run low on crackers.
And that’s it! A beautiful, tasty, simple cheese board.
Last quick tip: Take your cheese board out about 30 minutes before everyone digs in. While cheeses are best kept in the refrigerator, cheeses at room temperature really show off their flavor subtleties.